How to start a group session on Spotify PC & Mobile?
Are you missing those terrific music parties with your friends and loved ones with whom you now share a long-distance bond? Do you want to feel connected with them once again? Well, know that when you are far away from your friends and family, music becomes a lifeline. Sharing your favorite playlists can help you live great moments with them yet again. Not sure, how to go about it?
Let me explain to you how to start a group session on Spotify to bring your closest friends aboard and enjoy the moments together. Yes, you heard that right!! You can now enjoy Spotify group sessions where you and your friends can collaborate on a playlist together. It is as simple as sharing a link with your friends who can then control the playlists, skipping, shuffling, adding or deleting songs to playlists, and above all groove on the music and relive your past. Keep reading to find out more facts about the group sessions that can amaze you once I reveal them to you.
What is a Spotify Group session?
A Spotify group session is like a real-time, virtual Spotify listening party with six of your friends or family. It is a feature recently introduced by Spotify which has been working for a decade to bring more novelty and better user experience for its existing subscribers. The Spotify group sessions are primarily designed for premium members who can now create and share a mutual playlist.
The playlist is then shared using a link via text or WhatsApp. The friends who join the group session can now control the playback, adding or deleting songs or playlists, skipping or shuffling songs on this playlist. This is equivalent to a virtual listening party where you can jam along with your friends and family while every friend in the group equally shares control over the music being played.
How do Spotify Group Sessions work?
Spotify group sessions are an alternative to passing on your phone at a party. Just like many other premium features, the group session feature is a feature available to premium subscribers only. Not only this, the other 6 members of the group should also be premium subscribers of Spotify to enjoy the groove.
In Spotify group sessions. you allow the other 6 members of the group to actively control the playlists and become a DJ. Each member is allowed to add or delete songs, replay, skip, shuffle, or contribute to the playlist. Each time a member makes any changes to that playlist, every member’s screen gets updated with the changes made by that member.
Pros and Cons of Spotify Group Sessions
Pros
Cons
How to start a group session on spotify mobile
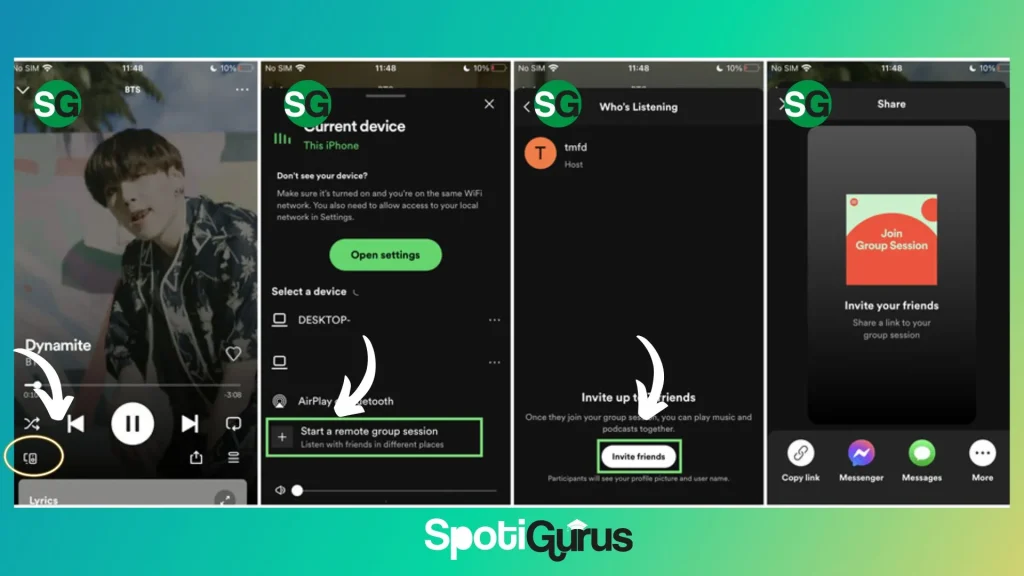
Starting a group session on Spotify mobile is easy and smooth. Follow these steps
- Launch your Spotify app on your Android, Apple, or iPad.
- Tap on the playlist you want to share with your friends in a group session.
- Click the Connect icon given at the bottom of the play screen.
- You will see a lot of nearby devices and the last option is to start a remote group session.
- You may invite up to 7 friends and press “+” to start the Spotify group session
- Share this invitation code with your friends and loved ones with whom you want to begin a group session with.
- Your friends can scan the code to join the group session on Spotify.
Note: You can download Spotify for Android, Spotify for IOS, and Spotify for PC here.

How to start a group session on Spotify PC/MAC (Desktop, Laptop)
The Spotify group session feature is currently available for mobile users only. However, there are third-party websites like Discord and JQBX that allow you to have group music sessions with friends.
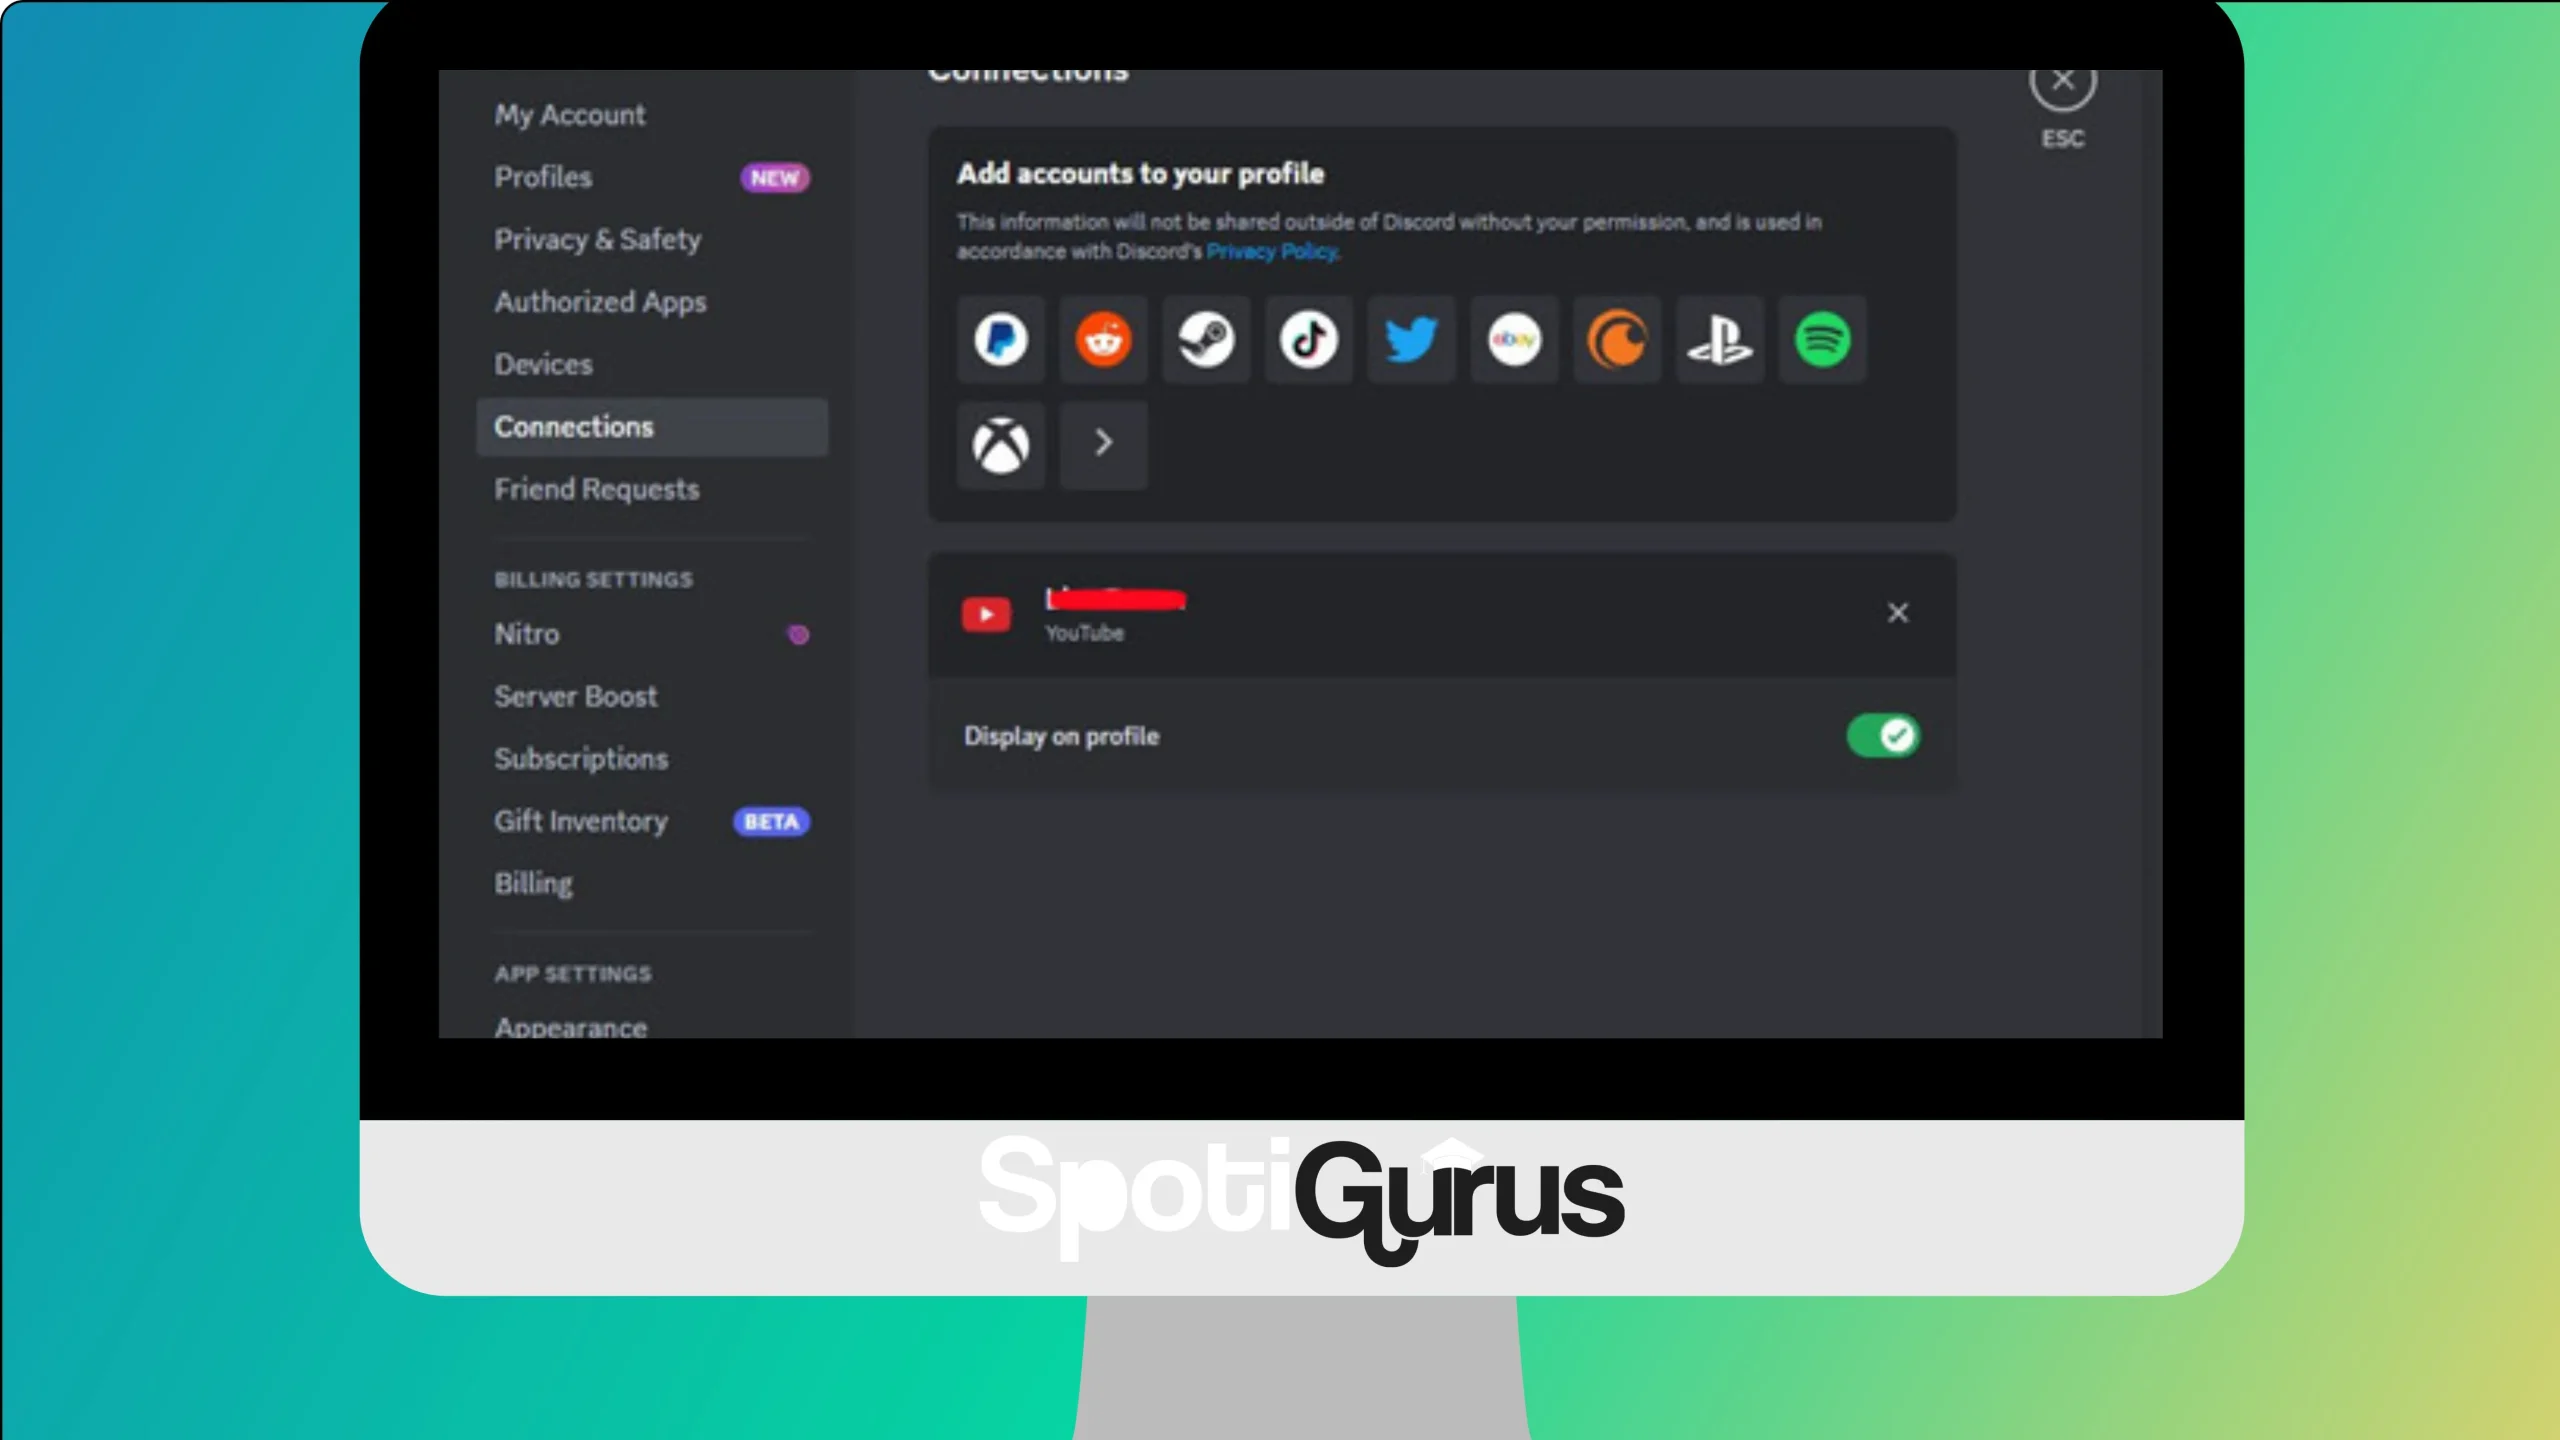
Discord is a third-party website that allows you to share music with friends. You can connect your spotify account with Discord, you can publically display your playlists, currently played tracks and allow listening together. So, if you are looking for how to start a group session on Spotify PC, here is how.
Step 1: Connect Spotify Premium to Discord
Click on the icon next to your username. From the options shown below, select “Connections”. You will be shown a list of apps that you can connect to Discord. Choose Spotify to add your Spotify account to Discord.

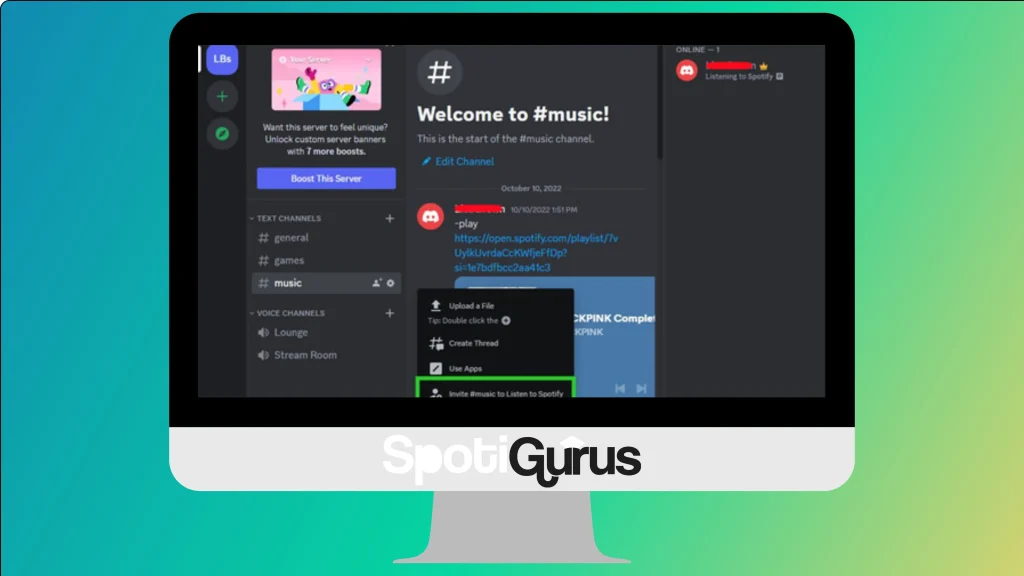
Step 2: Invite Friends to Discord
Now that you have connected your Spotify account to Discord, you can start listening to any favorite song on Spotify. Tap on “+” button to invite friends to Discord. You can send this invite through a Whatsapp message, a text message or a group message.

Is Spotify Group Session not working?
Group sessions are sometimes tricky, however, if you are facing this issue, it might be a technical glitch or cached files.
Technical Glitches
Technical issues within the Spotify app might prevent group sessions from working correctly.
Solution: Try logging out and then logging back in twice. This unusual step forces a cache refresh and might resolve the issue.


Cached Files
Cached files can sometimes cause trouble.
Solution: Perform a clean reinstall of the Spotify app. This process clears out cached files and might help.
How to add people on Spotify sessions?
To add people to a Spotify session, follow these steps:
- Open the Spotify app on your device.
- Start playing a song or playlist.
- Tap on the “Connect” icon located at the bottom-left corner of the screen. It looks like a speaker with sound waves emanating from it.
- Tap on “Devices Available” to see a list of available devices.
- Select the device you want to share your session with.
- Once connected, tap on the “Listener icon” located near the bottom of the screen (it looks like a person with a “+” sign).
- Enter the Spotify username, email address, or phone number of the person you want to add to your session.
- Tap on “Send” or “Invite” to send the invitation.
- The person you invited will receive a notification to join your session. Once they accept, they’ll be able to listen along with you.
- simply send them the code.
How to join Spotify group session
To join a Spotify group session, follow these step-by-step instructions:
- Open Spotify: Launch the Spotify app on your device.
- Navigate to Home: Tap on the “Home” icon located at the bottom left corner of the screen.
- Find the Group Session: Scroll down until you see the “Group Session” section. It usually appears under the “Made for You” section.
- Select Group Session: Tap on the group session you’d like to join.
- Join the Session: Tap on the “Join” button. If prompted, confirm your selection.
- Enjoy Listening: Once you’ve joined the session, you can listen to the music being played by the session host and interact with others in the group.
- That’s it! You’ve successfully joined a Spotify group session.
